Today we are going to work through replacing the self signed certs on the vCAV 1.5 C2C instances. If you are new to vCloud Availability for Cloud to Cloud, head on over to my college Daniel’s blog page here. He has a number of blogs around vCloud Availability.
vCAV C2C is the new generation of vCloud Directory Availability tools and will have DR2C added in the not too distant future. This build of vCAV radically improves the experience for both the provider when deploying and the customer when using the solution. By default, the appliances are deployed with a built in self signed certificate and if you want to expose the environment to the real world, you going to want to have properly signed certificates protecting the communications.
Step 1. First we are going to produce an unsigned certificates and place it in a new certificate store. (They will be replaced with signed certs later but we need the keys for the signing) Open a SSH session to your vCAV C2C instance and change to the /tmp directory. Execute the script below to create the certificate. It is placed in a certificate store called keystore.jks. You can ignore the warning about the JCEKS keystore using a propriety format. You should then have a file called keystore.jks in the /tmp directory.
NOTE: In the example below, I am using vmware as the password for both the private key and the key store itself. I suggest leaving them as vmware but if you are super security conscious, you will need to update the application.properties file in /opt/vmware/h4/cloud/config. Specifically these lines
keystore.location=./config/keystore.jks
keystore.password=vmware
keystore.alias=cloud
keystore.keypassword=vmware
keytool -keystore keystore.jks \
-alias cloud \
-storepass vmware \
-keypass vmware \
-storetype jks \
-genkeypair \
-keyalg RSA \
-keysize 2048 \
-validity 3650 \
-dname “CN=c2c-dc1-004.local, OU=Sales, O=VMware, L=Pittsford, S=New York, C=US” \
-ext “san=dns:c2c-dc1-004.local,dns:c2c-dc1-004,ip:192.168.21.84”
Step 2. Next we going to produce a certificate signing request (CSR) that we will send on to our Certificate Authority (CA). Once you execute the script below you should end up with a new file called c2c-dc1-004.csr.
keytool -keystore keystore.jks \
-storetype jks \
-storepass vmware \
-certreq \
-alias cloud \
-file c2c-dc1-004.csr \
-ext “san=dns:c2c-dc1-004.local,dns:c2c-dc1-004,ip:192.168.21.84”
Step 3. From here we need to get the CSR signed by our lab CA. See Part 2 of this series to find out how. The output of that process will be a .cer file that contain the signed certificate. Make sure you also get a copy of the CA’s root certificate as you will need it in Step 4. See Part 1 of this series to get the CA Root certificate if you don’t already have it.
Step 4. We are now going to take the two .cer files collected in step 3 (Root + Signed Cert) and load them into the certificate store file keystore.jks. You will need to use a tool like WinSCP to transfer the files to your C2C server. Once you have them there, execute the next two scripts to get the files into the store. Again, note that you must use the same alias names as in the script.
/opt/vmware/vcloud-director/jre/bin/keytool -keystore keystore.jks \

-storetype JCEKS \

-storepass ChangeMe \

-import \

-alias root \

-file LabCA.cer
/opt/vmware/vcloud-director/jre/bin/keytool -keystore keystore.jks \

-storetype JCEKS \

-storepass ChangeMe \

-import \

-alias http \

-file c2c-dc1-004.cer
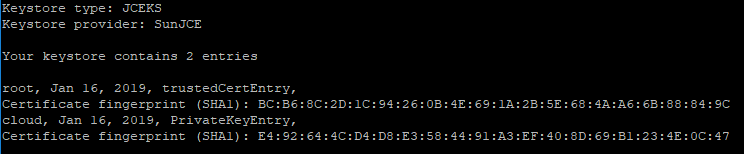
Once this is done, list the contents of the certificate store to make sure you see the root cna cloud certificate. (As well as any intermediate certificates if there are any)
keytool -storetype JCEKS -storepass vmware -keystore keystore.jks -list
Step 5. Now we are ready to replace the self signed certs. They are in a file called keystore.jks in /opt/vmware/h4/cloud/config.
First lets rename the existing file so we can revert if things don’t work out.
mv /opt/vmware/h4/cloud/config/keystore.jks /opt/vmware/h4/cloud/config/keystore-old.jks
and then copy over the new keystore we just created
cp /tmp/keystore.jks /opt/vmware/h4/cloud/config/keystore.jks
Very important, don’t forget to set ownership of the keystore.
chown h4:root /opt/vmware/h4/cloud/config/keystore.jks
Step 5. Finally, reconfigure the appliance and restart the service
/opt/vmware/h4/bin/sysboot.py
systemctl restart cloud
Give it 2 minutes and check that it is up and running with
systemctl status cloud

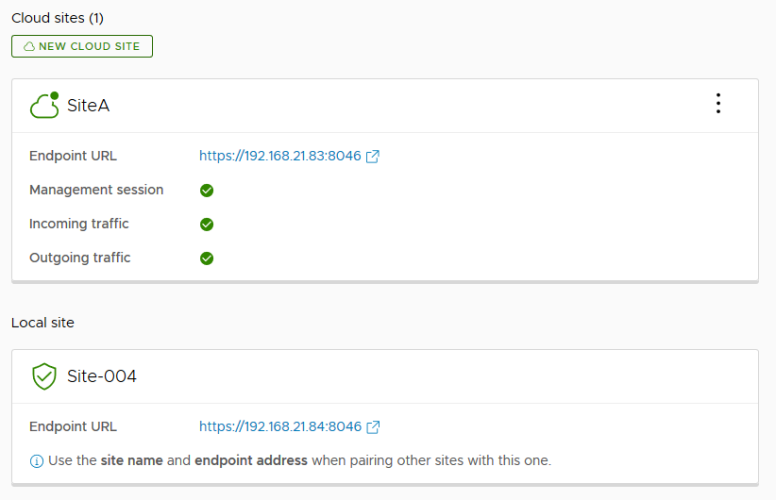
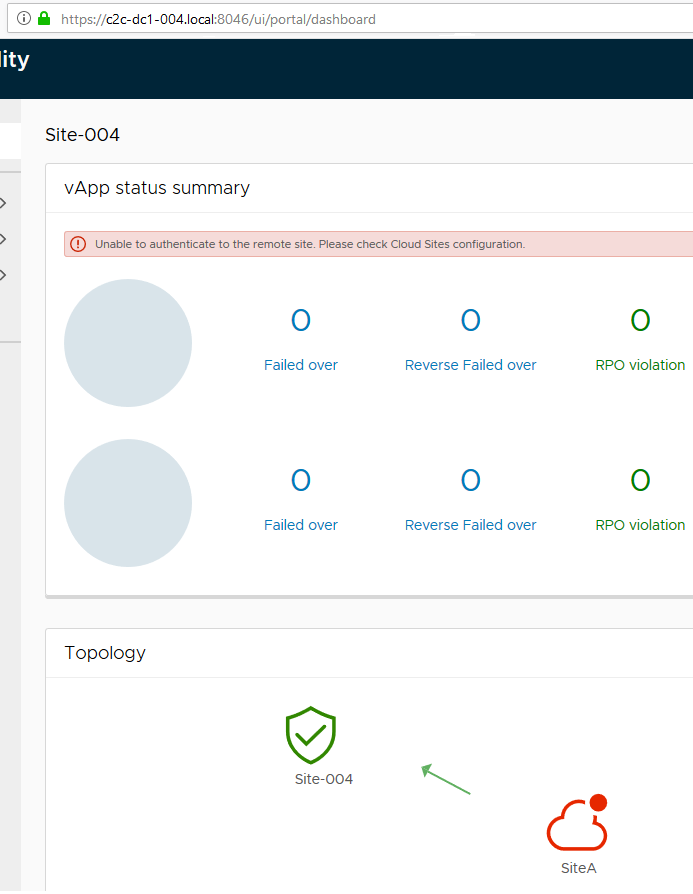
Step 6. Open a browser and go to https://your-c2c-url:8046. Firstly, the browser should indicate that the certificate is valid and after logging in, you should see that the connection to the remote site is broken.
Click on Cloud Sites and then hit the REPAIR in the failed site. It will ask you to accept the new certificate. Click LOGIN and enter the credentials and it should all be working again.