In this part of the series we will produce CA signed certificates for vRLI. In my environment, I have 3 vRLI instances sitting behind a load balancer. This means I have 4 possible URLs / IP address that need to be considered, the 1 for the load balancer and the one each for the 3 instances. This is important since we want to be able to connect to the VIP or the actual instances and need to define the subject alternate names to cover all possibilities.
You will need to have openssl installed to produce the keys and CSRs for this process. If you don’t have it, go here to get it. In the examples below, when I execute openssl commands from the command prompt, I am not showing paths. Depending on your installation of openssl and where you are executing from, you may need to add paths before the openssl command and file names in the command.
Step 1. First we going to generate a 2048 bit key. The key is placed into a file called vrli-dc1.key. This file will be used to generate the CSR as well as being loaded onto the Log Insight instances later in the process.
openssl genrsa -out vrli-dc1.key 2048
Generating RSA private key, 2048 bit long modulus
……………………………………………………………………………+++
…..+++
e is 65537 (0x10001)
Step 2. Next we are going to prepare a csr (Certificate Signing Request) This file is submitted to the Certificate Authority and used to create a signed certificate.
The openssl.cfg file looks like this:
[ req ]
default_bits = 2048
default_keyfile = vrli-dc1.key
distinguished_name = req_distinguished_name
encrypt_key = no
prompt = no
string_mask = nombstr
req_extensions = v3_req
[ v3_req ]
basicConstraints = CA:FALSE
keyUsage = digitalSignature, keyEncipherment, dataEncipherment
extendedKeyUsage = serverAuth, clientAuth
subjectAltName = DNS:vrli-dc1, IP:192.168.1.40, DNS:vrli-dc1.local, IP:192.168.1.40, DNS:vrli-dc1-001, IP:192.168.1.41, DNS:vrli-dc1-001.local, IP:192.168.1.41, DNS:vrli-dc1-002, IP:192.168.1.42, DNS:vrli-dc1-002.local, IP:192.168.1.42, DNS:vrli-dc1-003, IP:192.168.1.43, DNS:vrli-dc1-003.local, IP:192.168.1.43
[ req_distinguished_name ]
countryName = US
stateOrProvinceName = NY
localityName = Pittsford
0.organizationName = VMWare
organizationalUnitName = vCenterInventoryService
commonName = vrli-dc1.local
In my lab I have 3 Log Insight servers behind the integrated load balancer. In order to be able to connect to the instance using the VIP as well as directly to each of the instances without a certificate error, I have added the VIP and the IPs of each instance as well as the short and long names.
Execute the following. The CSR file will be called vrli-dc1.csr and is what must be shipped to your Certificate Authority.
openssl req -new -key vrli-dc1.key -out vrli-dc1.csr -config openssl.cfg
Step 3. From here we need to get the CSR signed by our lab CA. See Part 2 of this series to find out how. The output of that process will be a .cer file that has the signed certificate. Make sure you also get a copy of the CA’s root certificate as you will need it in Step 4. See Part 1 of this series to get the CA Root certificate if you don’t already have it.
Step 4. We now need to combine the Key generated in Step 1 and the CA Root Certificate and the .cer file produced in step 3. Use a text editor to create a new file and place the contents of the Key file into it. Next open the CA Root Certificate and copy the contents of the file directly under the Key. Lastly, take the contents of the .cer file produced when you signed the CSR and put it under the CA Root Certificate. You should end up with something that looks like this. Don’t forget to save the file.
—–BEGIN RSA PRIVATE KEY—–
MIIEogIBAAKCAQEAmPl04SiVt+tAAwkxQz6inV1D6cSBXbk4rlholKTLOTr8VVxe
pKtlPJENeBJ150JaYyQ+RST7cjQtGkqNyqrBS0vJDaK6/5TzkQ+P5hcC5H3x9GJv
QEeUMkpLw2Ku45wvSQCn/M0nRDJYHBLfF4rUsWMRRzARbM/RZZbiqp0hyxF44vXG
aP/R8hbnxvOg3pquGhwCMuFBGsylgm0fm2f3HxkwMjpVVqoLrk4MSveL7iB9ngfa
…
bBxZwsC+LDPjZAPa/A/xMyq4CVbYCg5XDJ1yrBry5w7u8XB44VtdJEfih4TIYn8s
Y+NHAoGAWGF+DLzcoHSs5bJafmebgB3HlxBRQDiJvpQyHIXxiB66t9JtukH83zSd
6xFiEfwLmOja4TdFmK72MToTOnfJ4DPvAAs0fifGiuY3E7h68M4WDSjHyqUo/2xW
l0vMYdufHA5xBQREjljs2copeeAIE5SdkJq0fF6/VmcjfvOBIVc=
—–END RSA PRIVATE KEY—–
—–BEGIN CERTIFICATE—–
MIIE+zCCAuOgAwIBAgIQawsxF90J0r5JtCHLqV7awjANBgkqhkiG9w0BAQsFADAQ
MQ4wDAYDVQQDEwVMYWJDQTAeFw0xNzEwMjYyMDM1NTBaFw0yNzEwMjYyMDQ1NDZa
MBAxDjAMBgNVBAMTBUxhYkNBMIICIjANBgkqhkiG9w0BAQEFAAOCAg8AMIICCgKC
AgEAv/PKRLqtgtWSS5fofsV4Bvniwzkiky8lPP7XCCG9ifdRy0eYpkM1y3Lnf0s6
…
eTrYP+eDerb910j0cvl9EpwkfizxKHznE/MBDXCseF1EqbIfAlokJyEyGRQp7Izf
vzMcx3oE5+BULe3kXMGUZppKDR2tmTG8E8v2I8liSKqjvkq3W5OBLHKRt+6O7Dx1
25YeFp7xN7dn6jjA9klYCCxYwKvLZg2dxWrfiw1+BuDJhzistLx1uVIAp1An0KGs
HGFxhql0/9jVqXyOmOMneU7lG5Spawik2NXCE3C0ow==
—–END CERTIFICATE—–
—–BEGIN CERTIFICATE—–
MIIF3jCCA8agAwIBAgITdgAAABIPjZJfI43OzQAAAAAAEjANBgkqhkiG9w0BAQsF
ADAQMQ4wDAYDVQQDEwVMYWJDQTAeFw0xODA0MjcxMzEyMzFaFw0xOTA0MjcxMzIy
MzFaMHoxCzAJBgNVBAYTAlVTMQswCQYDVQQIEwJOWTESMBAGA1UEBxMJUGl0dHNm
b3JkMQ8wDQYDVQQKEwZWTVdhcmUxIDAeBgNVBAsTF3ZDZW50ZXJJbnZlbnRvcnlT
…
FGZarCPg117mREaYzB3i2PSMc/ZKNoWKSLP6kNkuleCMJojlCExL7ytrF8bi/1ye
5P0QmJhUPBT4bYherVV2duWs7JxA5pom3YypaOqWzy84kqqQcj92MWboqHTN8SWR
7ekAFg1hr+kKywJ+wvtBbUAgIsYV8fORyVMrPO+q9ehhPVjapVfTUvJ6ceSANR3Z
X8gDJ/UH0QwgxYPVPFYkOCIk
—–END CERTIFICATE—–
(NOTE The … replaces a bunch of lines to reduce the size of the example above.)
Step 5. Finally we are going to load the certificate into the vRLI server. The great thing about vRLI is there is a method to do this directly in the UI and all instances automatically get the certificate so there is only one place that this needs to be done.
Connect to the admin UI by going to https://<YOUR_VRLI_URL_OR_IP>/admin. Under Configuration, click SSL and then click Choose File. Select the file saved in Step 4.
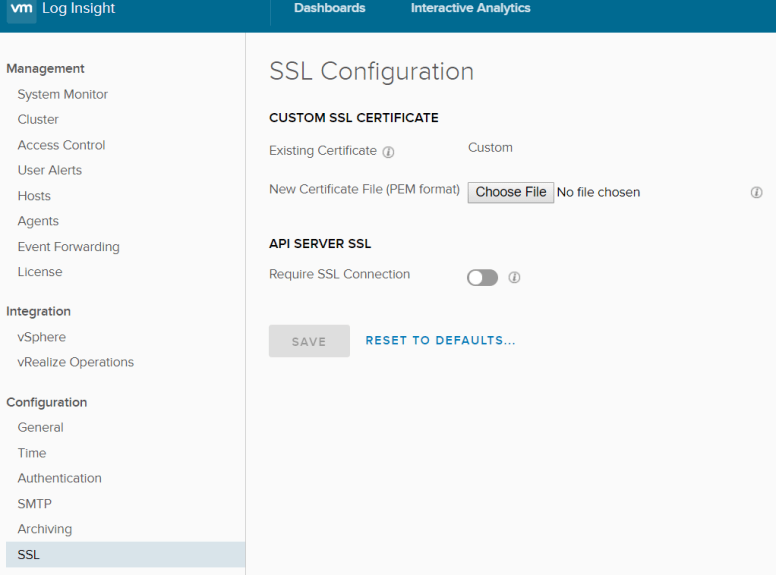
vRLI will now validate that the file contains the chain to the Root CA, and intermediate CAs (if applicable), the Private Key and the signed Certificate. If all goes well, the SAVE button will be enabled. Click it and you should see the following.

This process will take a few minutes to complete.
Step 6. And that is all you need to do. You will need to close any open browsers you have pointing to your instance and reopen them. When you do you should see a Green URL in your browser indicating that the certificate is valid and trusted.

In Part 4 in the series we will add certificates to vRealize Operations Manager.
